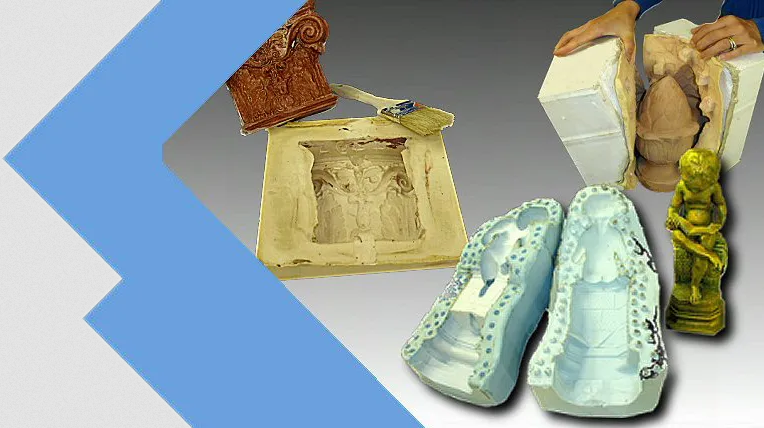
Making two-part molds is a skillful technique that can be used to effectively make molds for casting complex shapes, that too with incredible resolution. The parts will not need much cleanup either.
There are two basic techniques of how to make molds – block mold and blanket mold. The block mold is considered the simplest form of mold making and is suitable for uncomplicated models which (usually have a flat base). Similarly, blanket molds – like glove molds – are also straightforward to make and give good results.
However, when the model has deep undercuts or through holes or no flat bottom, the mold cannot be made in one go for obvious reasons. It calls for making the mold in two or more parts depending on the complexity of the model.
Giving it a go
The process of making two part molds begins with making a parting line. This will basically divide the model into two parts so that half of the mold can be made before proceeding to the other half. It is best to take the line from the very outermost edge of the curved surfaces of the model in a continuous seam all around the model.
Once the parting line is ready, the model is placed on a flat surface or in a mold box and then embedded till this line. Clay is usually used to build a partition for this purpose. At this point, create sprues in the form of funnel shaped holes in the mold. These are essential for pouring the casting material into the mold at a later stage. Having an air hole is also helpful as it will keep air from getting clogged in the sprues and allow for ease of use.
It is also important to make keys in both the parts of the mold. This will allow the mold parts to easily align and register together each time and will also keep the casting material from seeping out of the mold.
After the prepping
Once everything is ready, it is time to mix and pour the mold making material on the model. Pour the material in a thin stream from a corner of the mold box and allow it to settle in the keys and indentation on the model. Build up sufficient thickness to the mold half beyond the top most point of the model.
Let it cure properly before flipping the model over and removing the clay partition from the other side. Continue the same process on the other side to make the other half of the mold.
Once the mold has cured properly, separate the walls of the two parts of the mold and remove the model, sprues and air hole from inside. Once cleaned and finished, the mold is ready for use.
Binding straps or backing boards can be used to keep the two part mold in place while commencing the casting process. The casting material can be poured through the sprue hole and allowed to sit for proper curing. Once done, removing the bands will reveal the finished cast inside!
 RSS Feed
